publicvoidstart(){ stop(); // Make sure any currently running dispatchers are stopped. // Create the cache dispatcher and start it. mCacheDispatcher = new CacheDispatcher(mCacheQueue, mNetworkQueue, mCache, mDelivery); mCacheDispatcher.start();
// Create network dispatchers (and corresponding threads) up to the pool size. for (int i = 0; i < mDispatchers.length; i++) { NetworkDispatcher networkDispatcher = new NetworkDispatcher(mNetworkQueue, mNetwork, mCache, mDelivery); mDispatchers[i] = networkDispatcher; networkDispatcher.start(); } }
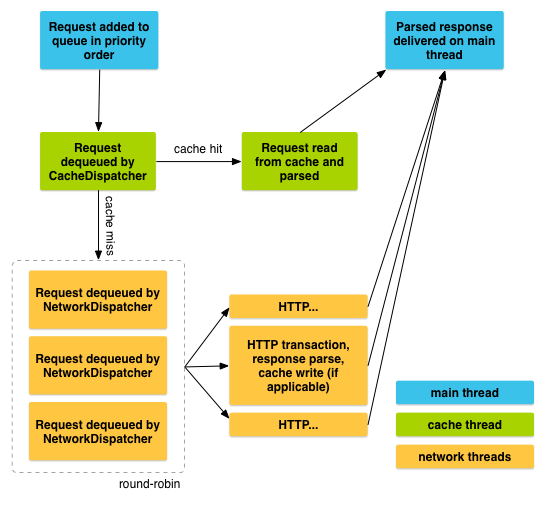
public <T> Request<T> add(Request<T> request){ // Tag the request as belonging to this queue and add it to the set of current requests. request.setRequestQueue(this); synchronized (mCurrentRequests) { mCurrentRequests.add(request); }
// Process requests in the order they are added. request.setSequence(getSequenceNumber()); request.addMarker("add-to-queue");
// If the request is uncacheable, skip the cache queue and go straight to the network. if (!request.shouldCache()) { mNetworkQueue.add(request); return request; }
// Insert request into stage if there's already a request with the same cache key in flight. synchronized (mWaitingRequests) { String cacheKey = request.getCacheKey(); if (mWaitingRequests.containsKey(cacheKey)) { // There is already a request in flight. Queue up. Queue<Request<?>> stagedRequests = mWaitingRequests.get(cacheKey); if (stagedRequests == null) { stagedRequests = new LinkedList<Request<?>>(); } stagedRequests.add(request); mWaitingRequests.put(cacheKey, stagedRequests); if (VolleyLog.DEBUG) { VolleyLog.v("Request for cacheKey=%s is in flight, putting on hold.", cacheKey); } } else { // Insert 'null' queue for this cacheKey, indicating there is now a request in // flight. mWaitingRequests.put(cacheKey, null); mCacheQueue.add(request); } return request; } }
@Override publicvoidrun(){ Process.setThreadPriority(Process.THREAD_PRIORITY_BACKGROUND); Request<?> request; while (true) { long startTimeMs = SystemClock.elapsedRealtime(); // release previous request object to avoid leaking request object when mQueue is drained. request = null; try { // Take a request from the queue. request = mQueue.take(); } catch (InterruptedException e) { // We may have been interrupted because it was time to quit. if (mQuit) { return; } continue; }
try { request.addMarker("network-queue-take");
// If the request was cancelled already, do not perform the // network request. if (request.isCanceled()) { request.finish("network-discard-cancelled"); continue; }
addTrafficStatsTag(request);
// Perform the network request. NetworkResponse networkResponse = mNetwork.performRequest(request); request.addMarker("network-http-complete");
// If the server returned 304 AND we delivered a response already, // we're done -- don't deliver a second identical response. if (networkResponse.notModified && request.hasHadResponseDelivered()) { request.finish("not-modified"); continue; }
// Parse the response here on the worker thread. Response<?> response = request.parseNetworkResponse(networkResponse); request.addMarker("network-parse-complete");
// Write to cache if applicable. // TODO: Only update cache metadata instead of entire record for 304s. if (request.shouldCache() && response.cacheEntry != null) { mCache.put(request.getCacheKey(), response.cacheEntry); request.addMarker("network-cache-written"); }
// A HTTP 304 response does not have all header fields. We // have to use the header fields from the cache entry plus // the new ones from the response. // http://www.w3.org/Protocols/rfc2616/rfc2616-sec10.html#sec10.3.5 entry.responseHeaders.putAll(responseHeaders); returnnew NetworkResponse(HttpStatus.SC_NOT_MODIFIED, entry.data, entry.responseHeaders, true, SystemClock.elapsedRealtime() - requestStart); } // Handle moved resources if (statusCode == HttpStatus.SC_MOVED_PERMANENTLY || statusCode == HttpStatus.SC_MOVED_TEMPORARILY) { String newUrl = responseHeaders.get("Location"); request.setRedirectUrl(newUrl); }
// Some responses such as 204s do not have content. We must check. if (httpResponse.getEntity() != null) { responseContents = entityToBytes(httpResponse.getEntity()); } else { // Add 0 byte response as a way of honestly representing a // no-content request. responseContents = newbyte[0]; }
// if the request is slow, log it. long requestLifetime = SystemClock.elapsedRealtime() - requestStart; logSlowRequests(requestLifetime, request, responseContents, statusLine);
publicExecutorDelivery(final Handler handler){ // Make an Executor that just wraps the handler. mResponsePoster = new Executor() { @Override publicvoidexecute(Runnable command){ handler.post(command); } }; }
@Override publicvoidrun(){ // If this request has canceled, finish it and don't deliver. if (mRequest.isCanceled()) { mRequest.finish("canceled-at-delivery"); return; }
// Deliver a normal response or error, depending. if (mResponse.isSuccess()) { mRequest.deliverResponse(mResponse.result); } else { mRequest.deliverError(mResponse.error); }
// If this is an intermediate response, add a marker, otherwise we're done // and the request can be finished. if (mResponse.intermediate) { mRequest.addMarker("intermediate-response"); } else { mRequest.finish("done"); }
// If we have been provided a post-delivery runnable, run it. if (mRunnable != null) { mRunnable.run(); } }
@Override publicvoidrun(){ if (DEBUG) VolleyLog.v("start new dispatcher"); Process.setThreadPriority(Process.THREAD_PRIORITY_BACKGROUND);
// Make a blocking call to initialize the cache. mCache.initialize();
Request<?> request; while (true) { // release previous request object to avoid leaking request object when mQueue is drained. request = null; try { // Take a request from the queue. request = mCacheQueue.take(); } catch (InterruptedException e) { // We may have been interrupted because it was time to quit. if (mQuit) { return; } continue; } try { request.addMarker("cache-queue-take");
// If the request has been canceled, don't bother dispatching it. if (request.isCanceled()) { request.finish("cache-discard-canceled"); continue; }
// Attempt to retrieve this item from cache. Cache.Entry entry = mCache.get(request.getCacheKey()); if (entry == null) { request.addMarker("cache-miss"); // Cache miss; send off to the network dispatcher. mNetworkQueue.put(request); continue; }
// If it is completely expired, just send it to the network. if (entry.isExpired()) { request.addMarker("cache-hit-expired"); request.setCacheEntry(entry); mNetworkQueue.put(request); continue; }
// We have a cache hit; parse its data for delivery back to the request. request.addMarker("cache-hit"); Response<?> response = request.parseNetworkResponse( new NetworkResponse(entry.data, entry.responseHeaders)); request.addMarker("cache-hit-parsed");
if (!entry.refreshNeeded()) { // Completely unexpired cache hit. Just deliver the response. mDelivery.postResponse(request, response); } else { // Soft-expired cache hit. We can deliver the cached response, // but we need to also send the request to the network for // refreshing. request.addMarker("cache-hit-refresh-needed"); request.setCacheEntry(entry);
// Mark the response as intermediate. response.intermediate = true;
// Post the intermediate response back to the user and have // the delivery then forward the request along to the network. final Request<?> finalRequest = request; mDelivery.postResponse(request, response, new Runnable() { @Override publicvoidrun(){ try { mNetworkQueue.put(finalRequest); } catch (InterruptedException e) { // Not much we can do about this. } } }); } } catch (Exception e) { VolleyLog.e(e, "Unhandled exception %s", e.toString()); } } }