七月中旬了,大家的实习有着落了吗?秋招又准备的怎么样了呢?我依旧在准备着秋招,每当想到自己以应届生的身份找着工作而工作却不一定要你的时候,难免也会有点失落。互联网行业的大佬们求贤若渴但对贤才也十分的苛刻,看到内推正如火如荼的进行着,深怕自己被这场浪潮甩在身后,所以也不得不苦心的准备着。如果你也是2018届应届生,如果你也看到了这篇文章,请你在留言区留下你找工作,准备秋招的感受,我们一起交流交流。
今天接着上篇文章一起来看看四大组件的老二——Service。话不多说我们开始吧!
前言
我们一般使用Service有两种方式,startService和bindService,这两种方法使用场景各有不同,本篇文章以startService为例讲解Service的启动过程,而bindService大体上与startService相近,只是一些逻辑调用上有所区别。
在这里我先贴上通过本次分析得到的Service完整的启动流程图,现在不需要理解其中的过程,只需要一步步分析源码的时候回过头来看看这幅图,以免迷失方向。当然我在每一步都会贴出相对应的流程图。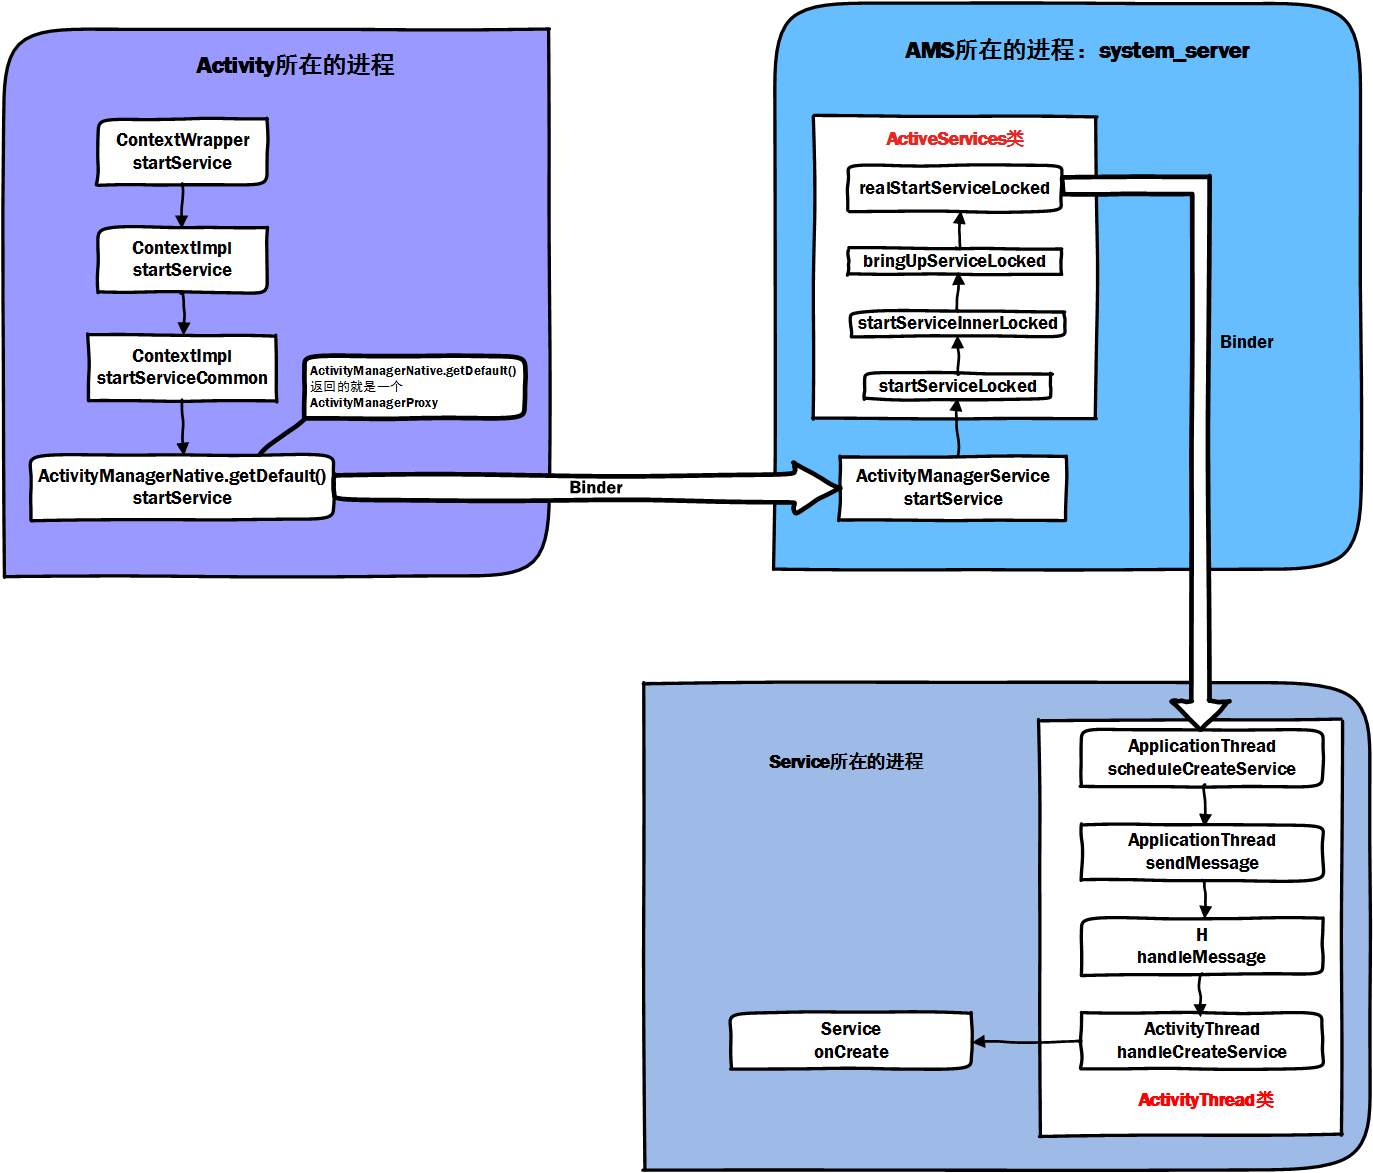
认识ContextImpl
首先先给出一张类图,我们从大局上看一下这些类的关系。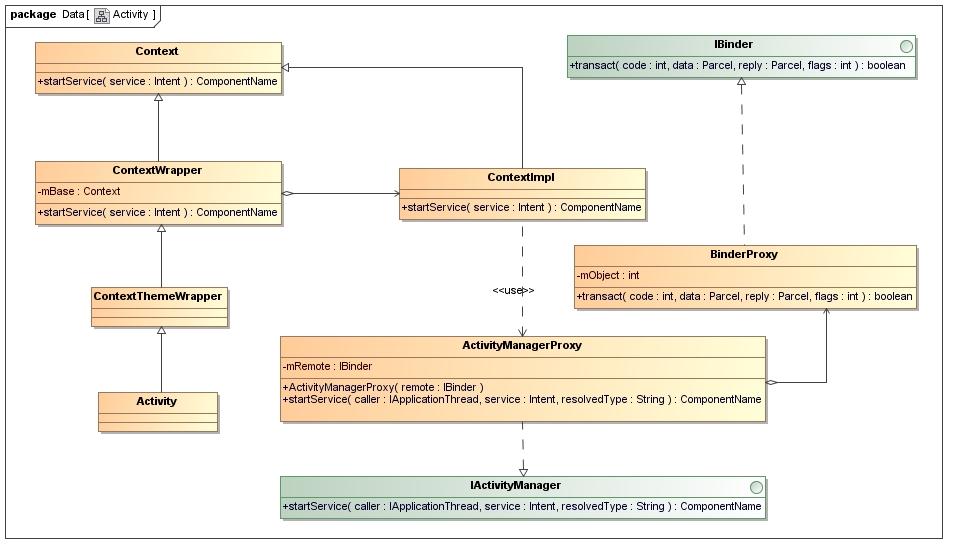
从上面这张图我们可以看到Activity继承了ContextWrapper类,而在ContextWrapper类中,实现了startService方法。在ContextWrapper类中,有一个成员变量mBase,它是一个ContextImpl实例,而ContextImpl类和ContextWrapper类一样继承于Context类。为什么会给出这张图呢?这对我们接下来的分析十分有用。
启动Service的入口
我们在Activity中使用startService(Intent service)来启动一个服务,其调用的方法如下:1
2
3
4
5//ContextWrapper类
public ComponentName startService(Intent service) {
return mBase.startService(service);
}
可以看到其调用了ContextWrapper的startService方法,而这个方法内部使用mBase的startService方法,我们再看回刚才的类图,可以看到,这里的mBase其实就是ContextImpl,从而我们可以得出ContextWrapper类的startService方法最终是通过调用ContextImpl类的startService方法来实现的。那接下来就来看看ContextImpl.startService()。1
2
3
4
5
6
7
8
9
10
11
12
13
14
15
16
17
18
19
20
21
22
23
24
25
26
27
28
29
public ComponentName startService(Intent service) {
warnIfCallingFromSystemProcess();
return startServiceCommon(service, mUser);
}
private ComponentName startServiceCommon(Intent service, UserHandle user) {
try {
validateServiceIntent(service);
service.prepareToLeaveProcess(this);
ComponentName cn = ActivityManagerNative.getDefault().startService(
mMainThread.getApplicationThread(), service, service.resolveTypeIfNeeded(
getContentResolver()), getOpPackageName(), user.getIdentifier());
if (cn != null) {
if (cn.getPackageName().equals("!")) {
throw new SecurityException(
"Not allowed to start service " + service
+ " without permission " + cn.getClassName());
} else if (cn.getPackageName().equals("!!")) {
throw new SecurityException(
"Unable to start service " + service
+ ": " + cn.getClassName());
}
}
return cn;
} catch (RemoteException e) {
throw e.rethrowFromSystemServer();
}
}
我们可以看到startService方法其实是调用了startServiceCommon,而startServiceCommon做了些什么呢?我们看到了一个熟悉的家伙:ActivityManagerNative.getDefault(),在上篇文章分析Activity启动的时候我们也看过他,并且我们也知道ActivityManagerNative.getDefault()返回的就是一个ActivityManagerProxy对象,这里使用Binder机制(如果你对Binder机制不是很了解,那可以看一下我之前写的这篇文章)将代理Proxy返回给客户端,而客户端通过将参数写入Proxy类,接着Proxy就会通过Binder去远程调用服务端的具体方法,因此,我们只是借用ActivityManagerProxy来调用ActivityManagerService的方法。所以这里其实是调用了远程ActivityManagerService的startService方法。
到这里我们先用流程图来看一下目前Service启动的情况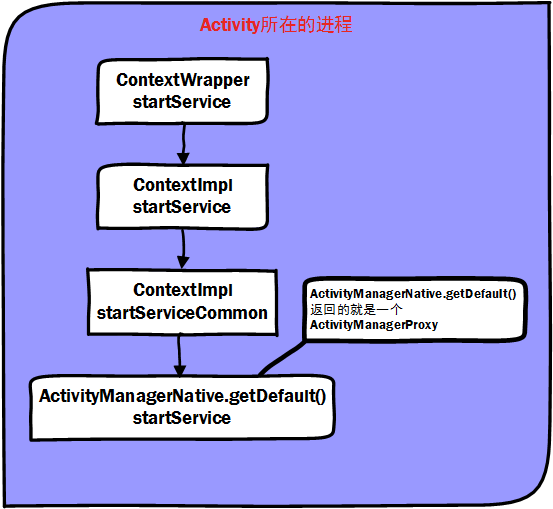
接下来我们就看看ActivityManagerService是如何实现的。
AMS如何进一步启动Service
1 | //ActivityManagerService类 |
可以看到这里调用了mService的startServiceLocked方法,那mService是干嘛的呢?此处的mServices是一个ActiveServices对象,从名字上也能看出该类主要是封装了一些处于活动状态的service组件的方法的调用。那接下来就看看他的startServiceLocked是如何实现的。1
2
3
4
5
6
7
8
9
10
11
12
13
14
15
16
17
18
19
20
21
22
23
24
25
26
27
28
29
30
31
32
33
34
35
36
37
38
39
40
41ComponentName startServiceLocked(IApplicationThread caller,
Intent service, String resolvedType,
int callingPid, int callingUid, int userId) {
//...
final boolean callerFg;
if (caller != null) {
//mAm 是ActivityManagerService.
final ProcessRecord callerApp = mAm.getRecordForAppLocked(caller);
if (callerApp == null) {
throw new SecurityException(
"Unable to find app for caller " + caller
+ " (pid=" + Binder.getCallingPid()
+ ") when starting service " + service);
}
callerFg = callerApp.setSchedGroup != Process.THREAD_GROUP_BG_NONINTERACTIVE;
} else {
callerFg = true;
}
ServiceLookupResult res = retrieveServiceLocked(service, resolvedType,
callingPid, callingUid, userId, true, callerFg);
if (res == null) {
return null;
}
if (res.record == null) {//权限拒绝.
return new ComponentName("!", res.permission != null
? res.permission : "private to package");
}
ServiceRecord r = res.record;
//
r.lastActivity = SystemClock.uptimeMillis();
r.startRequested = true;
r.delayedStop = false;
r.pendingStarts.add(new ServiceRecord.StartItem(r, false, r.makeNextStartId(),
service, neededGrants));
final ServiceMap smap = getServiceMap(r.userId);
boolean addToStarting = false;
//...
return startServiceInnerLocked(smap, service, r, callerFg, addToStarting);
}
代码稍微有点长,但是最重要的逻辑在于最后一句的startServiceInnerLocked方法,他的内部实现是这样的。1
2
3
4
5
6
7
8
9
10
11
12ComponentName startServiceInnerLocked(ServiceMap smap, Intent service,
ServiceRecord r, boolean callerFg, boolean addToStarting) {
//...
//真正开启service的地方。
String error = bringUpServiceLocked(r, service.getFlags(), callerFg, false);
//注意此处反回值是null的时候,证明没有异常.
if (error != null) {
return new ComponentName("!!", error);
}
//...
return r.name;
}
startServiceInnerLocked方法内部调用了bringUpServiceLocked方法来进行后续的启动。1
2
3
4
5
6
7
8
9
10
11
12
13
14
15private final String bringUpServiceLocked(ServiceRecord r, int intentFlags, boolean execInFg,
boolean whileRestarting) throws TransactionTooLargeException {
//...
if (app != null && app.thread != null) {
try {
app.addPackage(r.appInfo.packageName, r.appInfo.versionCode, mAm.mProcessStats);
realStartServiceLocked(r, app, execInFg);
return null;
}
//...
return null;
}
在bringUpServiceLocked方法中调用了realStartServiceLocked方法,在Activity的启动过程中我们也曾看过相似的方法,说明到了这里我们也快看到真正的Service启动了,接着来看realStartServiceLocked。1
2
3
4
5
6
7
8
9
10
11
12
13
14
15
16
17
18
19
20
21
22
23
24
25
26
27private final void realStartServiceLocked(ServiceRecord r,
ProcessRecord app, boolean execInFg) throws RemoteException {
//...
boolean created = false;
try {
//...
app.forceProcessStateUpTo(ActivityManager.PROCESS_STATE_SERVICE);
app.thread.scheduleCreateService(r, r.serviceInfo,
mAm.compatibilityInfoForPackageLocked(r.serviceInfo.applicationInfo),
app.repProcState);
r.postNotification();
created = true;
} catch (DeadObjectException e) {
Slog.w(TAG, "Application dead when creating service " + r);
mAm.appDiedLocked(app);
throw e;
}
//这里会调用Service的onStartCommand
sendServiceArgsLocked(r, execInFg, true);
//...
}
我们先用流程图看看Service启动的逻辑。接着在下面会着重讲解上方的realStartServiceLocked方法。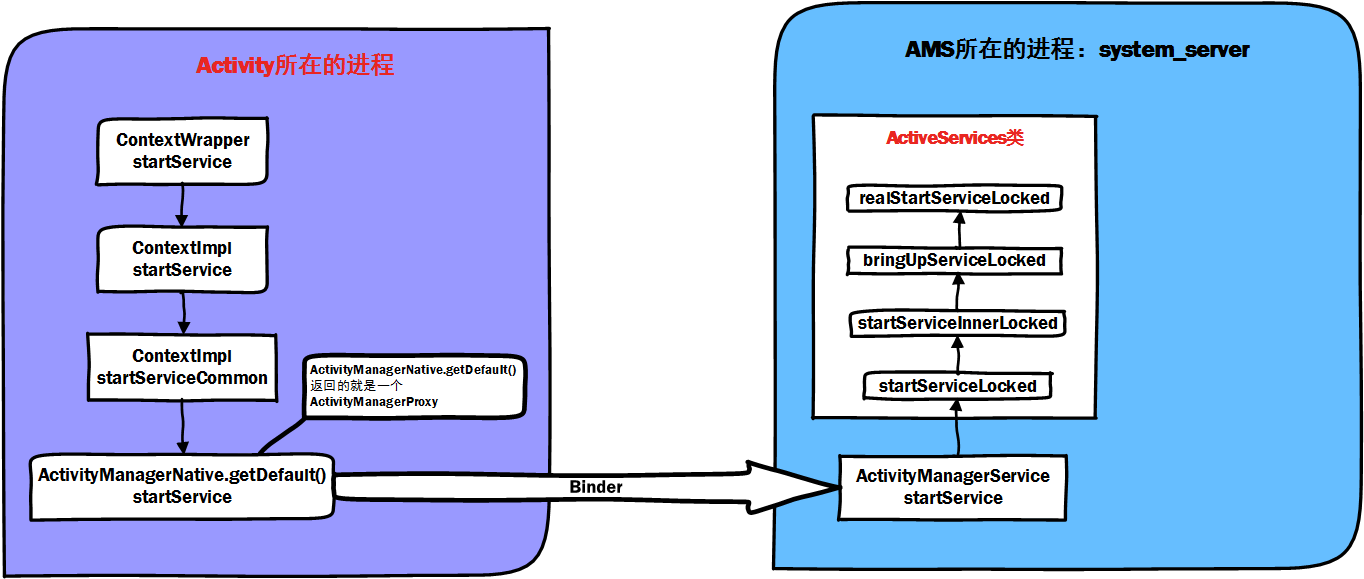
realStartServiceLocked
这里需要对上面的app.thread做一下特殊的说明。如果你已经了解了Binder的通信机制,那你应该知道一般我们的服务都是由客户端向服务端发出请求,接着服务端向客户端返回结果,这个是单向的通信,但是如果反过来服务端要向客户端发送请求的话,那么同样的,在服务端也应该持有另外一个Proxy,而在客户端也同样需要一个Manager与之对应。
在这里app是要运行 Service 的进程对应的ProcessRecord对象,代表一个应用进程,而thread是一个ApplicationThreadProxy对象,它运行在AMS(现在AMS就是客户端了),而与之对应的服务端则是在应用程序中的ApplicatonThread,还是有点绕,我们用一张图来展示他们的关系。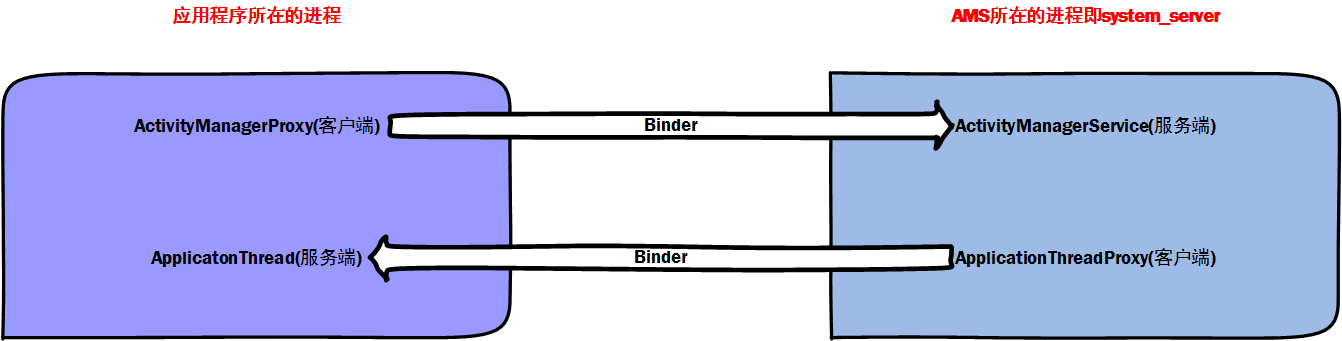
相信通过上面的图示大家应该能够明白应用程序进程与系统服务进程之间的双向通信了吧!
还需要再唠叨一下ApplicationThread与ApplicationThreadProxy之间的关系,我们通过这两个类的定义可以更深刻的理解他们的关系
- IApplicationThread
1 | public interface IApplicationThread extends IInterface |
IApplicationThread其实是一个IBinder类型的接口。并且在这个接口中声明了许多与Activity,Service生命周期相关的方法,那么它的实现类又是谁呢?答案就是ApplicationThreadNative。
- ApplicationThreadNative
1 | public abstract class ApplicationThreadNative extends Binder implements IApplicationThread |
可以看到ApplicationThreadNative是一个抽象类,我们不能直接创建其对象,应该使用其子类,而恰好ApplicationThread就是其子类
- ApplicationThread
1 | private class ApplicationThread extends ApplicationThreadNative |
ApplicationThread就是真正意义上的服务端,它的父类ApplicationThreadNative就是将具体的操作将给它来执行的。
- ApplicationThreadProxy
1 | class ApplicationThreadProxy implements IApplicationThread |
说了那么多,在客户端运行的ApplicationThreadProxy在哪里呢?其实如果理解了Binder机制,那么我们应该知道他就是ApplicationThreadNative的内部类,客户端(AMS)就是通过它与service所在的进程进行通信的。因此我们接着要看的当然是ApplicationThread的scheduleCreateService了。
ApplicationThread.scheduleCreateService
1 | public final void scheduleCreateService(IBinder token, |
可以看到在scheduleCreateService方法中发送了一个message,其消息类型为CREATE_SERVICE,它是在H类中定义的一个常量,而H类其实就是继承于Handler的,它专门用来处理发送过来的请求。接下来就来看看它是如何处理创建service这个消息的。
H.handleMessage
1 | public void handleMessage(Message msg) { |
可以看到handleMessage处理了很多类型的消息,包括service的创建、绑定、解绑、销毁等等,我们直接看创建的逻辑,也就是handleCreateService方法。不过有一个问题,那就是Handler创建之前必须要创建Looper,否则会报错,那么Looper是在哪里创建的呢?答案就是ActivityThread的main方法。1
2
3
4
5
6
7
8
9
10
11
12
13
14
15
16
17public static void main(String[] args) {
//...
//在主线程创建Looper
Looper.prepareMainLooper();
ActivityThread thread = new ActivityThread();
thread.attach(false);
if (sMainThreadHandler == null) {
sMainThreadHandler = thread.getHandler();
}
AsyncTask.init();
Looper.loop();
throw new RuntimeException("Main thread loop unexpectedly exited");
}
我们可以看到Looper就是在这里创建的,而Handler也是在Service进程中的主线程,也就是说它处理消息也是在主线程,那么Service的创建自然也就是在主线程中。可是ActivityThread是什么鬼呢?其实刚才的ApplicationThread就是它的内部类。
接下来继续看Handler如何处理消息。
1 | private void handleCreateService(CreateServiceData data) { |
在这里Handler通过反射机制拿到Service对象,于是就调用了service的onCreate方法,所以Service就算是启动了。我们通过层层的寻找总算是见到了onCreate的庐山真面目。
我们依旧用流程图来展示一下Service启动的全过程。
onStartCommand
可是还有另外一个重要的方法onStartCommand呢?不急,我们刚才在sendServiceArgsLocked方法中还有另外一个sendServiceArgsLocked方法没有讲到,他就是onStartCommand的入口,我们看看他是如何实现的。1
2
3
4
5
6
7
8
9
10
11
12
13
14
15
16
17
18
19
20
21
22private final void sendServiceArgsLocked(ServiceRecord r, boolean execInFg,
boolean oomAdjusted) {
final int N = r.pendingStarts.size();
if (N == 0) {
return;
}
while (r.pendingStarts.size() > 0) {
try {
//与调用scheduleCreateService方法一样,远程调用ApplicationThread的scheduleServiceArgs方法
r.app.thread.scheduleServiceArgs(r, si.taskRemoved, si.id, flags, si.intent);
} catch (RemoteException e) {
// Remote process gone... we'll let the normal cleanup take
// care of this.
if (DEBUG_SERVICE) Slog.v(TAG, "Crashed while scheduling start: " + r);
break;
} catch (Exception e) {
Slog.w(TAG, "Unexpected exception", e);
break;
}
}
}
我们看到这里依旧调用了远程服务端ApplicationThread的方法来执行后面的逻辑,其实通过上面分析onCreate的逻辑大家应该能够知道调用onStartCommand也是大同小异的,具体的调用逻辑就交给大家去分析啦!
后记
到这里呢,我们就把Service的启动流程完整的讲解了一遍,希望大家通过这篇文章能够对Service更加的了解,毕竟四大组件中Service的地位还是举足轻重的,并且在面试中也会经常被问到,希望大家逢问必会O(∩_∩)O哈哈~